Thursday, July 11, 2013

Remove desktop shortcut arrow in Windows 7

For me, the shortcut arrow at the left-bottom of each application icon is disturbing. What I want is original clean application icons without additional arrows.

Below is my desktop (see the shortcut arrows):

The steps to remove the arrows:

Step 1 - Open registry editor

To open the registry editor: click the windows icon at the left-bottom of your cursor, or hit the windows key on your keyboard, then type regedit and press enter.

WARNING: 
DO NOT CHANGE ANYTHING ELSE. CHANGE ONLY AS INSTRUCTED BELOW.


Step 2 - Find HKEY_CLASSES_ROOT

Find the HKEY_CLASSES_ROOT, it should be the first folder. Then expand the folder to see the contents

Step 3 - Find lnkfile

Now under the HKEY_CLASSES_ROOT you should be able to find lnkfile. If you click it, you will see one of the keys is IsShortcut

Step 4 - Rename the key IsShortcut

You have to rename IsShortcut to different name. To rename it, right-click IsShortcut then select Rename

Now you can rename it for example from IsShotcut to IsShortcutn 


Step 5 - Restart your computer

You just simply close the registry editor then restart your computer. Once the computer restarted, now the arrows are removed.


Friday, June 21, 2013

Preparing Springer article manuscript in LyX (Windows)

For most journals in Springer, the global  manuscript submision LaTeX class is svjour3. The following is the preparation steps in Windows
(Tested in Windows 7, 64-bit):


Step 1 - Download LaTeX svjour3 class and bst


Step 2 - Relocate the svjour3 class package

  • For Windows 64-bit:
    • Find the MiKTeX installation: C:\Program Files (x86)\MiKTeX 2.9
    • Go to C:\Program Files (x86)\MiKTeX 2.9\tex\latex then create a new folder svjour3
    • Unzip the global.zip and all extracted files to
      C:\Program Files (x86)\MiKTeX 2.9\tex\latex\svjour3
  • For Windows 32-bit:
    • Windows 32-bit: C:\Program Files\MiKTeX 2.9
    • Go to C:\Program Files\MiKTeX 2.9\tex\latex then create a new folder svjour3
    • Unzip the global.zip and all extracted files to
      C:\Program Files\MiKTeX 2.9\tex\latex\svjour3 


Step 3 - Relocate the bibliography style (bst) files

  • For Windows 64-bit:
    • Find the MiKTeX installation: C:\Program Files (x86)\MiKTeX 2.9
    • Go to C:\Program Files (x86)\MiKTeX 2.9\bibtex\bst then create a new folder svjour3
    • Move the downloaded files from  ftp://ftp.springer.de/pub/tex/latex/svjour3/bibtex to
      C:\Program Files (x86)\MiKTeX 2.9\bibtex\bst\svjour3
  • For Windows 32-bit:
    • Windows 32-bit: C:\Program Files\MiKTeX 2.9
    • Go to C:\Program Files\MiKTeX 2.9\bibtex\bst then create a new folder svjour3
    • Move the downloaded files from  ftp://ftp.springer.de/pub/tex/latex/svjour3/bibtex to
      C:\Program Files\MiKTeX 2.9\bibtex\bst\svjour3 


Step 4 - Refresh LaTeX filename database

  • Open MikTeX settings:
 
  •  Click Refresh FNDB


Step 5 - Reconfigure LyX

  • Open LyX
  • From them menu Tools, select Reconfigure

  • After successfully reconfigure LyX, close it. After this configuration process, the class article (Springer svjour3/global) will be available.


Step 6 - Working with springer article template in LyX

  • Download the svjour3/global template (svjour3-authoryear-template.zip) here and unzip it to a folder. You can rename the lyx file if you want.
  • You have to have all figures in the same folder. When you submit in springer you have to submit all figures in the springer submission system. All figures must be the same folder with the tex file.
  • The submitted file is the LaTeX tex file not lyx format.
  • To get tex file.
    From the menu File > Export > LaTeX (plain)

Saturday, June 15, 2013

Install printer/scanner Canon PIXMA MG2270 in Ubuntu

Canon printers and scanners are not supported by default in Ubuntu. The printer and scanner drivers must be downloaded from the manufacturer and installed in Ubuntu system.
Canon supports Windows, Mac and Linux machines.

The following steps are the way I installed Canon PiXMA MG2270 in Ubuntu. Tested in Ubuntu 12.04 and 12.10.


Step 1 - Download printer and scanner drivers MG2200 series

Go to Canon support http://support-my.canon-asia.com/?personal. Under the Inkjet Printers, select Product series: PIXMA, Model: MG2270 and Document type: Drivers and softwareThen click Find.


  • Click OS option Linux.
  • Download the MG2200 series IJ Printer Driver Ver. 3.80 for Linux (debian). The downloaded filename: cnijfilter-mg2200series-3.80-1-deb.tar.gz.
  • Download the MG2200 series ScanGear MP Ver. 2.00 for Linux (debian). The downloaded filename: scangearmp-mg2200series-2.00-1-deb.tar.gz.


Step 2 - Extract the downloaded compressed files

  • Right click on the cnijfilter-mg2200series-3.80-1-deb.tar.gz, then click Extract here. It creates a new folder cnijfilter-mg2200series-3.80-1-deb.
  • Right click on the scangearmp-mg2200series-2.00-1-deb.tar.gz, then click Extract here. It creates a new folder scangearmp-mg2200series-2.00-1-deb.


Step 3 - Install printer driver

  • Open folder cnijfilter-mg2200series-3.80-1-deb, then open subfolder packages 
 
  • For 64-bit machine:
    • Double click cnijfilter-common_3.80-1_amd64.deb. It opens Ubuntu Software Center, then click Install.
    • Double click cnijfilter-mg2200series_3.80-1_amd64.deb. It opens Ubuntu Software Center, then click Install.
  •  For 32-bit machine:
    • Double click cnijfilter-common_3.80-1_i386.deb. It opens Ubuntu Software Center, then click Install.
    • Double click cnijfilter-mg2200series_3.80-1_i386.deb. It opens Ubuntu Software Center, then click Install.


Step 4 - Install scanner driver and scanner software

  • Open folder scangearmp-mg2200series-2.00-1-deb, then open subfolder packages 
  • For 64-bit machine:
    • Double click scangearmp-common_2.00-1_amd64.deb. It opens Ubuntu Software Center, then click Install.
    • Double click scangearmp-mg2200series_2.00-1_amd64.deb. It opens Ubuntu Software Center, then click Install.
  •  For 32-bit machine:
    • Double click scangearmp-common_2.00-1_i386.deb. It opens Ubuntu Software Center, then click Install.
    • Double click scangearmp-mg2200series_2.00-1_i386.deb. It opens Ubuntu Software Center, then click Install.


Step 5 - Add new Canon MG2270 printer in Ubuntu

  • Turn on  MG2270 and plug the usb cable to the ubuntu computer.
  • Click Ubuntu dash and type printer. After clicking printer, it opens printer setting. Click Add button and wait a minute the Canon printer will appear. Select it and click Forward

  • After printer configuration settings completed, the new printer MG2200 series appears in the printer list.


Step 6 - Using scanner MG2270

  • Make sure you turn on  MG2270 and plug the usb cable to the ubuntu computer.
  • Open Ubuntu terminal or press Ctrl+Alt+T, then type scangearmp. A simple scanning software ready to use the Canon MG2270 scanner,

Friday, March 29, 2013

Using m-functions in FreeMat

FreeMat is a free environment for rapid engineering and scientific prototyping and data processing. It is similar to commercial systems such as MATLAB from Mathworks.

If you don't have FreeMat installed, you can refer here how to get FreeMat.

The folder where you save the m functions should be defined in FreeMat path.

Step 1, Open pathtool in FreeMat:
The tool to integrate m-function folder in FreeMat is pathtool.


(a) Open FreeMat and type pathtool and Enter. Alternatively you can open the path tool window from the menu  Tool > Path Tool
(b) Find the folder where you save your m files (for example m-functions) on the left box, then select  Add, Save then confirm it by pressing Done.

Step 2, Restart FreeMat:
Restart FreeMat to completely integrate the m files path.


After restarting FreeMat, it can access and use the m files located in the folder (in this example the name of the folder is m-functions).

Sunday, March 17, 2013

Installation Fortran Java and C++ in Netbeans IDE

The following steps will guide you to install free GNU Fortran (gfortran), C/C++ (g++) and Java (oracle) in Netbeans in Windows7. There are 3 installation parts that you have to do, starting from Part 1, Part 2 then Part 3.


PART 1 - Install GNU Fortran (gfortran) and GNU C/C++ (g++)

Step 1 - Download gfortran and g++ from MinGW

MinGW, a contraction of "Minimalist GNU for Windows", is a minimalist development environment for native Microsoft Windows applications.

MinGW includes GNU Compiler Collection (GCC), including C, C++, ADA and Fortran compilers.

You have to download GUI wrapper (mingw-get-inst) for the command line installer. Select the latest one from here. For example mingw-get-inst-20120426.exe

Step 2 - Install MinGW to your computer

This step will install C, C++, Fortran, MSYS basic system, and MinGW developer tool.

Goto your folder where you saved MinGW installer, and just run it (or double click) to start the installation process. Do not change the default installation folder, so Netbeans path will recognise MinGW.

Make sure you select the required components (C, C++, Fortran, MSYS, and MinGW) when you are requested to select the components.

Step 3 - Add installation path MinGW to your computer

This step will add MinGW installation path to your computer. Netbeans will recognize this path during the activation of C/C++ and Fortran compiler.

To edit your PATH environment variable in Windows:

  • Right click on Computer > Properties
      
  • Click the Advanced system settings
      
  • Click the Environment Variable
      
  • Select Path and click Edit
      
  • Add (DO NOT REPLACE THE EXISTING VALUE) to the end of variable value, the following paths:
             ;C:\MinGW\bin;C:\MinGW\MSYS\1.0\bin


PART 2 - Install Java and Netbeans

Step 1 - Download bundles Java+Netbeans

The bundle of the latest version of  Java+Netbeans can be downloaded from 
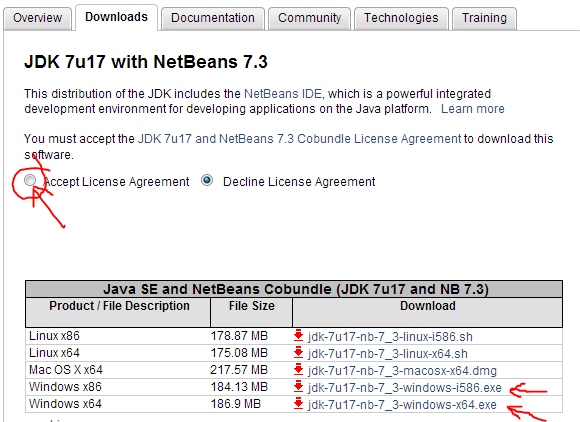
Oracle website. Select JDK + Netbeans
Accept the agreement and start dowloading the bundle installer (-i586.exe for 32bit machine, -x64.exe for 64bit machine).

Step 2 - Install Java+Netbeans

This step will install Netbeans and Java.

As normal installation in Win7, goto the folder where you saved the executable bundle java+netbeans, then run it (or double click) the exe file. Follow all instructions until successfully completed.


Step 3 - Activate C/C++ and Fortran 

Your C/C++ and Fortran have not been activated. The C/C++ plugin must be installed. Although the name is plugin C/C++, it includes Fortran compiler as well. Open Netbeans, from the menu Tools, select Plugins
From the available plugin list, select C/C++. Then click the Install button. This plugin will be downloaded from Netbeans repository.

Step 4 - Setting C/C++ and Fortran paths

Open Netbeans, from the menu Tools, select Options
Select C/C++ tab, then click  Restore Defaults
If the paths cannot be automatically appeared, make sure you do PART-1 Step-3.


PART 3 - Testing your installation works


Step 1 - Fortran Hello Word test

Now you can test your Fortran. 


  • Open Netbeans
  • File > New Project > Select Project >Choose Project - Samples -  C/C++ > Fortran Hello Word Application
     
         Continue until finish setting the new project.
  • From the project window, select bar.f then Run. You should be able to run your fortran program.
      
Step 2 - C++ Welcome test


Now you can test your C++. 


  • Open Netbeans
  • File > New Project > Select Project > Choose Project - Samples -  C/C++  > Welcome
  • Continue until finish setting the new project.

  • From the project window, select welcome.cc then Run. You should be able to run your C++ program.
     

Now you have a powerful programming environment in your computer. You can use Fortran, Java or C/C++.