Monday, October 12, 2020

Shutter screenshot tool in Ubuntu 20.04

I frequently use screen capture to record the steps in using software. The best tool for doing this is Shutter. So I make it available every time my Ubuntu 20.04 starts.
 

Step 1: Open Startup Applications


From the left corner button, click Show Applications
 

then select Startup Applications


Step 2: Add shutter in startup list


Shutter should be listed in the startup program by adding the command. 

For the name field, type: shutter

For the command field, type: shutter --min_at_startup
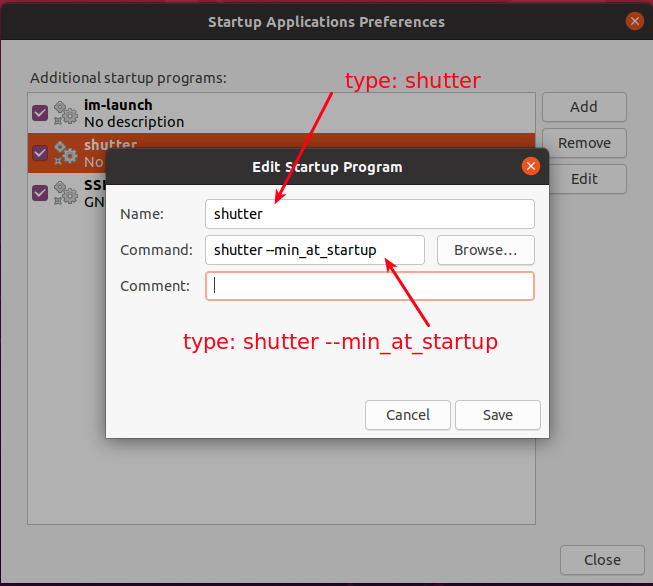
the click Save button.


Step 3: Restart Ubuntu


To make Shutter runs on startup, then restart the machine and you can see the shutter icon. Shutter is now ready to use.


and enjoy using Shutter.


Friday, October 9, 2020

Solving network and wifi icons with question mark in Ubuntu 20.04 Focal Fossa

Recently I installed new Ubuntu 20.04 in my new HP notebook running AMD® Ryzen 5 3500u. After complete installed, the network icon changed to a network icon with a question mark, although the internet was working normally.
 

To solve this 


Step 1 - Ubuntu Settings


 Open Settings


Step 2 - Connectivity Settings


Select privacy menu, then in the connectivity option, turn it off.

After this step, the question mark gone. The icon looks fine and normal as expected. This also solved wifi icon with question mark.


Saturday, August 30, 2014

Styling Drupal Better Login with CSS

I use Drupal module Better Login. The default style is so plain. Styling is necessary to change the look of the login page. The style can be changed by modifying the css file betterlogin.css in folder /sites/all/modules/betterlogin/css

This is the example of my login page:


the betterlogin.css file:

#auth_box {
  width: 300px;
  margin: 0 auto;
  padding: 50px 0 0;
  font-family: sans-serif;
  background: #0779bf ;
}

  #auth_box h1#the_logo {
    text-align: center;
    margin: 0;
    padding: 0 0 25px;
    background: #48a9e4; /* #CEF6F5 ; */
    box-shadow: 0 0 3px 1px #ccc;
  }
   
    #auth_box h1#the_logo img {
      max-width: 250px;
      color: white;
    }
 
  #auth_box h2.title {
    margin: 0;
    padding: 0 0 15px;
    font-size: 2em;
  }
 
  #auth_box input[type="text"],
  #auth_box input[type="password"] {
    width: 260px;
    border: 1px #ccc solid;
    border-radius: 3px;
    padding: 5px;
    font-size: 15px;
  }

  #auth_box input[type="submit"] {
    float: right;
  }

  #auth_box #middle_part {
    border-radius: 3px;
/*    background: #E6F810; #fff; */
background-image: -webkit-gradient(
    linear,
    left top,
    left bottom,
    color-stop(0, #4BF6FC),
    color-stop(0.56, #E5F810)
);
background-image: -o-linear-gradient(bottom, #4BF6FC 0%, #E5F810 56%);
background-image: -moz-linear-gradient(bottom, #4BF6FC 0%, #E5F810 56%);
background-image: -webkit-linear-gradient(bottom, #4BF6FC 0%, #E5F810 56%);
background-image: -ms-linear-gradient(bottom, #4BF6FC 0%, #E5F810 56%);
background-image: linear-gradient(to bottom, #4BF6FC 0%, #E5F810 56%);   
    padding: 15px;
    overflow: hidden;
    box-shadow: 0 0 3px 1px #ccc;  
  }

  #auth_box .back_link {
    padding: 15px 0 0;
    color: white ;
  }

  #auth_box #bottom_part {
    font-size: 13px;
    padding: 15px 0 0;
  }
 
/* WAS */
body.html.not-front.not-logged-in.no-sidebars.page-user.page-user-login {
  background: #0779bf;
}

 #auth_box .password_link a {
    color: white;
  } 

  #auth_box .back_link a {
    color: white ;
  }
 
  body.html.not-front.not-logged-in.no-sidebars.page-user.page-user-password {
  background: #0779bf;
}
 
 #auth_box .login_link a {
    color: white;
  } 
 
div#edit-actions {
  background: #E6F810;
}

Thursday, August 28, 2014

Rename My Account to Login Username

In Drupal 7, after user login then the user menu "My Account" and "Logout" links appear at the right corner.  This would be better if  I can change the link "My Account" to the login username.


This is the default:

And this is what I want:

STEP 1: Open user.module file
The user.module file can be found in folder /modules/user

STEP 2: Change the code
from:

function user_menu_title() {
  return user_is_logged_in() ? t('My Account') : t('User account');
}


to:
function user_menu_title() {
  return user_is_logged_in() ? $GLOBALS['user']->name : t('User account');
}


another method can be found here:

Saturday, August 9, 2014

Minbar Prayer Times in Ubuntu 14.04

I recently installed Ubuntu 14.04 replacing the old version 11.04 (not upgrading), then I did the following steps to install Minbar Prayer

a) Install Minbar Prayer Times from Ubuntu Software Center
b) Include minbar in startup program
c) Set the preference of minbar to "startup minimised to tray"
In older Ubuntu versions Minbar Prayer Times should be located on right top panel, but now it is missing. Rebooting the machine did not help.

Then I did the following steps to show the Minbar icon:
Step 1: From Ubuntu terminal (Ctrl+Alt+T), enter the command
sudo apt-add-repository ppa:gurqn/systray-trusty
Step 2: enter the command
sudo apt-get update

Step 3: enter the command
sudo apt-get upgrade
Step 4: then reboot the system by entering the command
sudo reboot

Finally the icon Minbar Prayer Time shown on top panel, and it starts (but minimised mode) every time the system starts.


Another reference related this problem can be found here.

Wednesday, August 6, 2014

WYSIWYG editor in Drupal 7.30

In the previous Drupal version (before 7.30), the installation of CKEditor in Drupal was not straight forward. I had to download CKEditor, saved it to the web server then modified a bit the code in CKEditor to get it worked.

Now to get WYSIWYG CKEditor editor working in Drupal 7.30 is simple. Only one module is required, and it works. The installation must be done by the administrator of the website.

This is tested in Drupal 7.30, PhP 5.3.28. The CKEditor installation result is version 4.4.3.

Step 1: Go to Module menu
 
Step 2:  Then select Install new module

Step 3: Get the CKEditor module
Go to the project website https://www.drupal.org/project/ckeditor , then copy the module link location
Step 4: Paste the link to the installation
Step 5: Enable CKEditor module
 Once the installation completed, select Enable newly added modules

 Make sure you enable it, by clicking the selection box


then don't forget to save the configuration (at the bottom of the page)
Step 6: If you create a node, the editor is now equipped with the WYSIWYG tools.

Thursday, July 11, 2013

Remove desktop shortcut arrow in Windows 7

For me, the shortcut arrow at the left-bottom of each application icon is disturbing. What I want is original clean application icons without additional arrows.

Below is my desktop (see the shortcut arrows):

The steps to remove the arrows:

Step 1 - Open registry editor

To open the registry editor: click the windows icon at the left-bottom of your cursor, or hit the windows key on your keyboard, then type regedit and press enter.

WARNING: 
DO NOT CHANGE ANYTHING ELSE. CHANGE ONLY AS INSTRUCTED BELOW.


Step 2 - Find HKEY_CLASSES_ROOT

Find the HKEY_CLASSES_ROOT, it should be the first folder. Then expand the folder to see the contents

Step 3 - Find lnkfile

Now under the HKEY_CLASSES_ROOT you should be able to find lnkfile. If you click it, you will see one of the keys is IsShortcut

Step 4 - Rename the key IsShortcut

You have to rename IsShortcut to different name. To rename it, right-click IsShortcut then select Rename

Now you can rename it for example from IsShotcut to IsShortcutn 


Step 5 - Restart your computer

You just simply close the registry editor then restart your computer. Once the computer restarted, now the arrows are removed.


Friday, June 21, 2013

Preparing Springer article manuscript in LyX (Windows)

For most journals in Springer, the global  manuscript submision LaTeX class is svjour3. The following is the preparation steps in Windows
(Tested in Windows 7, 64-bit):


Step 1 - Download LaTeX svjour3 class and bst


Step 2 - Relocate the svjour3 class package

  • For Windows 64-bit:
    • Find the MiKTeX installation: C:\Program Files (x86)\MiKTeX 2.9
    • Go to C:\Program Files (x86)\MiKTeX 2.9\tex\latex then create a new folder svjour3
    • Unzip the global.zip and all extracted files to
      C:\Program Files (x86)\MiKTeX 2.9\tex\latex\svjour3
  • For Windows 32-bit:
    • Windows 32-bit: C:\Program Files\MiKTeX 2.9
    • Go to C:\Program Files\MiKTeX 2.9\tex\latex then create a new folder svjour3
    • Unzip the global.zip and all extracted files to
      C:\Program Files\MiKTeX 2.9\tex\latex\svjour3 


Step 3 - Relocate the bibliography style (bst) files

  • For Windows 64-bit:
    • Find the MiKTeX installation: C:\Program Files (x86)\MiKTeX 2.9
    • Go to C:\Program Files (x86)\MiKTeX 2.9\bibtex\bst then create a new folder svjour3
    • Move the downloaded files from  ftp://ftp.springer.de/pub/tex/latex/svjour3/bibtex to
      C:\Program Files (x86)\MiKTeX 2.9\bibtex\bst\svjour3
  • For Windows 32-bit:
    • Windows 32-bit: C:\Program Files\MiKTeX 2.9
    • Go to C:\Program Files\MiKTeX 2.9\bibtex\bst then create a new folder svjour3
    • Move the downloaded files from  ftp://ftp.springer.de/pub/tex/latex/svjour3/bibtex to
      C:\Program Files\MiKTeX 2.9\bibtex\bst\svjour3 


Step 4 - Refresh LaTeX filename database

  • Open MikTeX settings:
 
  •  Click Refresh FNDB


Step 5 - Reconfigure LyX

  • Open LyX
  • From them menu Tools, select Reconfigure

  • After successfully reconfigure LyX, close it. After this configuration process, the class article (Springer svjour3/global) will be available.


Step 6 - Working with springer article template in LyX

  • Download the svjour3/global template (svjour3-authoryear-template.zip) here and unzip it to a folder. You can rename the lyx file if you want.
  • You have to have all figures in the same folder. When you submit in springer you have to submit all figures in the springer submission system. All figures must be the same folder with the tex file.
  • The submitted file is the LaTeX tex file not lyx format.
  • To get tex file.
    From the menu File > Export > LaTeX (plain)

Saturday, June 15, 2013

Install printer/scanner Canon PIXMA MG2270 in Ubuntu

Canon printers and scanners are not supported by default in Ubuntu. The printer and scanner drivers must be downloaded from the manufacturer and installed in Ubuntu system.
Canon supports Windows, Mac and Linux machines.

The following steps are the way I installed Canon PiXMA MG2270 in Ubuntu. Tested in Ubuntu 12.04 and 12.10.


Step 1 - Download printer and scanner drivers MG2200 series

Go to Canon support http://support-my.canon-asia.com/?personal. Under the Inkjet Printers, select Product series: PIXMA, Model: MG2270 and Document type: Drivers and softwareThen click Find.


  • Click OS option Linux.
  • Download the MG2200 series IJ Printer Driver Ver. 3.80 for Linux (debian). The downloaded filename: cnijfilter-mg2200series-3.80-1-deb.tar.gz.
  • Download the MG2200 series ScanGear MP Ver. 2.00 for Linux (debian). The downloaded filename: scangearmp-mg2200series-2.00-1-deb.tar.gz.


Step 2 - Extract the downloaded compressed files

  • Right click on the cnijfilter-mg2200series-3.80-1-deb.tar.gz, then click Extract here. It creates a new folder cnijfilter-mg2200series-3.80-1-deb.
  • Right click on the scangearmp-mg2200series-2.00-1-deb.tar.gz, then click Extract here. It creates a new folder scangearmp-mg2200series-2.00-1-deb.


Step 3 - Install printer driver

  • Open folder cnijfilter-mg2200series-3.80-1-deb, then open subfolder packages 
 
  • For 64-bit machine:
    • Double click cnijfilter-common_3.80-1_amd64.deb. It opens Ubuntu Software Center, then click Install.
    • Double click cnijfilter-mg2200series_3.80-1_amd64.deb. It opens Ubuntu Software Center, then click Install.
  •  For 32-bit machine:
    • Double click cnijfilter-common_3.80-1_i386.deb. It opens Ubuntu Software Center, then click Install.
    • Double click cnijfilter-mg2200series_3.80-1_i386.deb. It opens Ubuntu Software Center, then click Install.


Step 4 - Install scanner driver and scanner software

  • Open folder scangearmp-mg2200series-2.00-1-deb, then open subfolder packages 
  • For 64-bit machine:
    • Double click scangearmp-common_2.00-1_amd64.deb. It opens Ubuntu Software Center, then click Install.
    • Double click scangearmp-mg2200series_2.00-1_amd64.deb. It opens Ubuntu Software Center, then click Install.
  •  For 32-bit machine:
    • Double click scangearmp-common_2.00-1_i386.deb. It opens Ubuntu Software Center, then click Install.
    • Double click scangearmp-mg2200series_2.00-1_i386.deb. It opens Ubuntu Software Center, then click Install.


Step 5 - Add new Canon MG2270 printer in Ubuntu

  • Turn on  MG2270 and plug the usb cable to the ubuntu computer.
  • Click Ubuntu dash and type printer. After clicking printer, it opens printer setting. Click Add button and wait a minute the Canon printer will appear. Select it and click Forward

  • After printer configuration settings completed, the new printer MG2200 series appears in the printer list.


Step 6 - Using scanner MG2270

  • Make sure you turn on  MG2270 and plug the usb cable to the ubuntu computer.
  • Open Ubuntu terminal or press Ctrl+Alt+T, then type scangearmp. A simple scanning software ready to use the Canon MG2270 scanner,